Customizing the Availability Grid Options
Last modified on:
Overview
Your Availability Grid can be customised to meet your business needs, enhancing business processes and operator experience. Options include quick notifications and alerts, and setting the grid to display in a particular order.
Customisation Options:
- Unit Sort Order
- Grid View Tabs
- Custom Alerts
- Reservation Colours
- Unit Type/Unit Descriptions
- Notes Unit
- Events
Prerequisites
Ensure you have access to the system's setup and configuration options to customise the Availability Grid.
Steps
Unit Sort Order
- Adjust the order of appearance for Unit Types and Unit numbers to fit your business requirements.
- Navigate to the Setup tab via the Menu button, then click on Unit Type Setup.
- Sort Unit Types within the Unit Type Setup panel. This sort order will reflect on the All Types view tab and the Online Booking page.
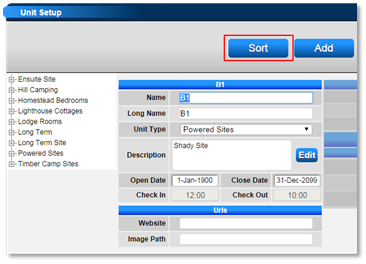
- Click Sort and adjust the Sort Order value for each Unit Type.
- Preview changes by pressing Sort, then finalise by pressing Submit.
- In the Unit Setup panel, click Sort and adjust the Sort Order value for each Unit.
- Preview changes by pressing Sort, then finalise by pressing Submit.
- The sort order will display within each Unit View tab on the Availability Grid.
Grid View Tabs
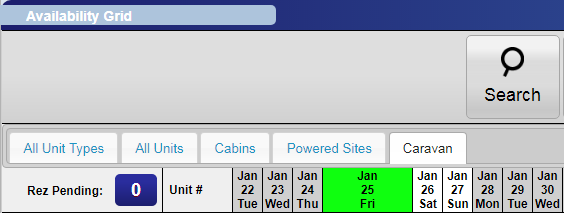
- Create customised View tabs for specific Unit Types, Units, or Property Maps.
- Default Grid Views include:
- All Unit Types: Displays each Unit Type's available inventory count.
- All Units: Displays all active Units and reservations.
- Navigate to the Setup tab via the Menu button, then click on Grid View Setup.
- Options include Unit Type, Unit, Map, and Down to the Minute (additional paid module).
- Add a Grid View by clicking Add to create a custom Grid View.
- Enter the label for the View tab and select the required Grid View type.
- For Unit Type, select the required Unit Types to display.
- For Unit, select the required Units to display. Select all Units within a Unit Type if needed.
- For Map, select the required map to display.
- For Down to the Minute, select the required DTM Units.
- Set the order of appearance using Priority.
- Enable Resort Web for DTM View tab if available for online bookings.
- Set Default View for the required View tab when accessing the Availability Grid.
- Activate or deactivate the View tab as needed.
Custom Alerts
- Create Custom Alerts to adjust reservation and Unit type colours, indicating alerts to operators.
- Navigate to the Utilities button from the Availability Grid, then click Go next to Alert Setup.
- Click Add to create a new Alert.
- Enter the alert name in Label and select the alert colour.
- Choose Alert Type: Grid for reservation colour changes, Unit for Unit colour changes.
- Optionally, enter a description for the alert colour.
- Finalise by pressing Submit.
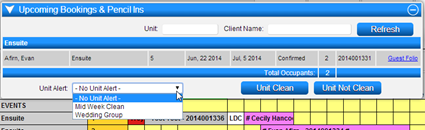
- To change a Unit's colour, select the Unit in the Unit # column on the Availability Grid and choose the alert from the Unit Alert dropdown.
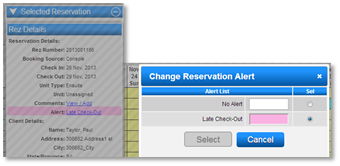
- To change a reservation's colour, select the reservation on the Availability Grid, click on the Alert link in the Till tape, and choose the alert.
Reservation Colours
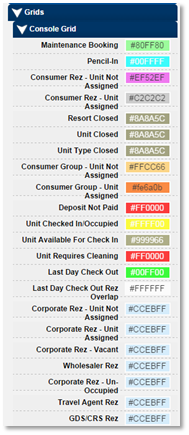
- Default reservation colours change based on Payment/Unit Assigned status.
- To change default colours, navigate to the Setup tab via the Menu button, select Theme Editor, and expand RezExpert Console > Grids > Console Grid.
- Adjust colours using the Colour Wagon.
Unit Type/Unit Description
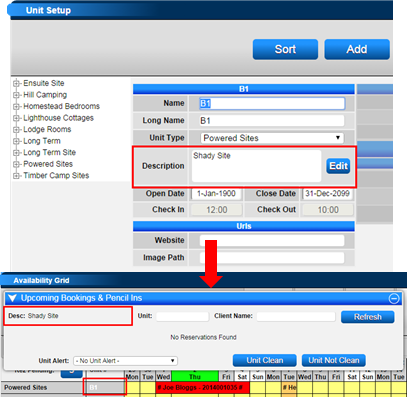
- Display Unit Type and Unit Description in dropdown lists for quick reference.
- Navigate to the Setup tab via the Menu button, then click Unit Type Setup.
- For Unit Type Description, select the Unit Type in the All Types tree list, click Edit next to the Description box, enter the text, and press Submit.
- Repeat for remaining Unit Types.
- For Unit Description, within the Unit Setup panel, select the desired Unit’s Unit Type, click the Unit, click Edit next to the Description box, enter the text, and press Submit.
- Repeat for remaining Units.
Notes Unit
- Create a Notes or Events Unit Type for special notes or events.
- Navigate to the Setup tab via the Menu button, then click Unit Type Setup.
- In the Unit Type Setup panel, click Add, enter the Unit Type name, tick Hide On Web, set Location Count to 1, and press Submit.
- To add notes on the Availability Grid, select the Unit and Start date, drag for the required nights, click Go in Create Pencil In, select Maintenance flag, enter a note in Comments, and press Submit.

Events
- Create events and associated notes for staff awareness.
- Navigate to the Setup tab via the Menu button, then click Events.
- Click Add to create a new Event, enter Start and End dates, select Unit Types, enter the event name, select Event Occur Type, and add comments if needed.
- Enable Restrict Online Access to prevent online bookings during event dates.
- Highlight the date range on the Availability Grid if needed.
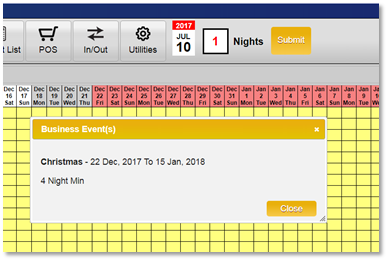
- Staff can view events by clicking Utilities, then Check Current Events.
Troubleshooting
For further assistance, refer to the Help Document.