Setting Up Wholesalers Business Records
Last modified on:
Overview
Wholesalers are companies you do business with where you sell inventory at an agreed (often discounted) rate. They are often contracted to a fixed allocation of inventory. Bookings made by wholesalers have the reservation charges transferred to the wholesalers' Accounts Receivable Account at checkout. Pre-payments and final payments by the wholesaler are actioned on the wholesalers' AR Account. Contact your RezExpert Support Tech to enable Memberships modules.
Prerequisites
- Ensure Memberships modules are enabled by contacting your RezExpert Support Tech.
Steps
Wholesale Rate(s)
- Multiple wholesalers may share the same pricing structure and membership type. Examples include:
- Wholesale -5%
- Wholesale -10%
- City Info Centre -20%
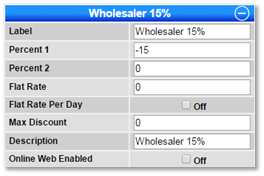
- Discounts can be created to handle the wholesaler rates, e.g., Wholesale -5%.
To set up a discount:
- Click on a Menu button, select the Setup tab, and click on Discount Setup.
- Click Add.
- Label: Wholesale – 5% (or alternate wholesaler name for identification).
- Percent 1: Enter in the negative discount value, for example, -5. Or, if the wholesale rate is a flat amount off, enter in the negative flat rate.
- Press Submit to finalize.
- If wholesalers have a set rate and not a discount, a Rate Group can be created instead.
To set up a rate group:
- Click on a Menu button, select the Setup tab, and click on Rate Group Setup.
- Click Add.
- Label: Wholesale – 5% (or alternate wholesaler name for identification).
- Press Submit to finalize.
Membership Type(s)
- Multiple wholesalers may share the same pricing structure and membership type. Examples include:
- Wholesale -5%
- Wholesale -10%
- City Info Centre -20%
- Membership Type for wholesalers needs to be created in Member Type Setup.
To set up a membership type:
- Click on a Menu button, select the Setup tab, and click on Member Type Setup.
- Click Add.
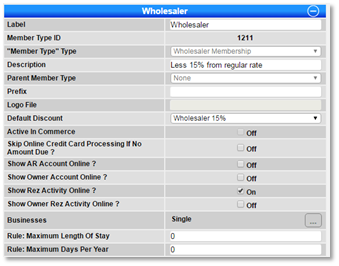
- Label: Wholesale -5% (or alternate wholesaler name).
- Member Type ID: The system will generate the Member Type ID.
- “Member Type” Type: Select Wholesaler Membership.
- Default Discount: Select the applicable discount. (If a Rate Group has been created, this setting can be skipped).
- Inventory Segment: If a defined Wholesale Inventory Segment is required for this membership, see Step 3 & 4.
- Press Submit to finalize.
Inventory Segment for Membership Type(s)
To create inventory segments for wholesale:
- Click on a Menu button, click on Inventory Segment Setup, within the Main tab.
- Click Add.
- Enter in the Label of the Inventory Segment, for example, Wholesale 5%.
- After the Inventory Segment has been created, scroll down and expand the panel Member Type/Source Defaults.
- Assign the new Inventory Segment to the Wholesale Member Types displaying.
- Note: It is recommended to have the Default inventory as the Wholesale Inventory Segment.
- If a Rate Group has been created, it can be assigned to the Wholesale Member Type in the Member Type/Source Defaults panel also.
Inventory Allocation
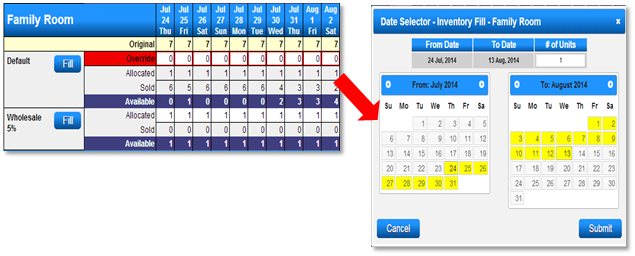
- Click on a Menu button and click on Inventory Allocation, within the Main tab.
- Click on All Unit Types and click Fill next to the Wholesale Inventory Segment.
- Change the Dates selected if necessary.
- Enter in the # of Units to be allocated.
- Press Submit to finalize.
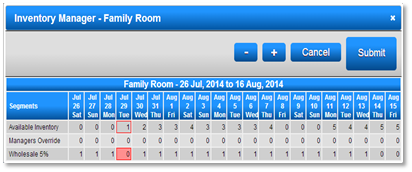
- This new Inventory Segment will now also display within the Inventory Manager, when accessed from Utilities button – Check or Review Blocked Inventory.
- Note: The quantity allocated from the Default Segment to a Wholesale (or another segment) will reduce the total units available that can be sold from the Online Booking page and Console (Default) grid. Unsold Inventory in Wholesale segments can be moved back to the Default Segment as required.
- On the Availability Grid, click on a Unit within the required Unit Type and Date. Click Utilities button from the Availability Grid, click Go to Check or Review Blocked Inventory.
- Click – or + to release or increase the number allocated to the required Inventory Segment.