Ticket Setup and Design Guide
Last modified on:
Overview
Create your own ticket design with images, supported Bar Codes & QR Code lookups, that can be printed and/or emailed to the customer. Tickets can be coupons, inventory-based, or regular event-style tickets.
NOTE: The Ticket Module needs to be enabled prior to creating tickets. Contact your RezExpert tech support to enable the module.
Internal Links
- Location
- Layout
- Ticket Types
- Adding a Ticket
- Adding a Ticket - Regular
- Adding a Ticket - Inventory
- Coupon - Adding a Coupon Ticket
- Coupon Tickets Online
- Regular - Adding a Regular Ticket
- Regular Ticket Rates
- Selling Tickets Online
- Regular - Adding an Inventory Ticket
- Assigning Inventory
- Inventory Ticket Rates
- Selling Tickets Online
Prerequisites
- Ensure the Ticket Module is enabled. Contact RezExpert tech support for assistance.
Steps
Location
- Click on a Menu button.
- Select the Setup tab.
- Click on Ticket Setup.
Layout
The Ticket Setup panel has three tabs:
- General: Contains the Ticket settings. All created tickets will display on the left under their status and ticket type.
- Inventory: Contains the Ticket Inventory (for Inventory Tickets only).
- Rates: Contains the Ticket rates.
Ticket Types
There are three Ticket Types available:
- Coupon: Special deals.
- Regular: Any quantity of tickets are available to be sold each day. No restriction on the number of tickets available to be sold.
- Inventory: Maximum Inventory available each day/time allocation, only a fixed number of tickets can be sold, e.g., 20 per day.
Adding a Ticket
- Click Add.
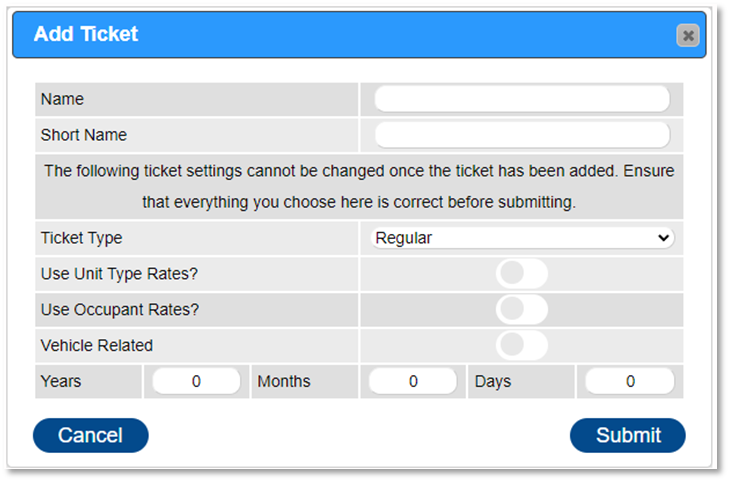
- The Add Ticket box will appear to select the Ticket Type.
- Enter the following details:
- Name: Enter the name of the ticket.
- Short Name: Enter a short name.
- Ticket Type: Select the type of ticket. - If Ticket Type – Regular is selected, refer to Adding a Ticket - Regular.
- If Ticket Type – Inventory is selected, refer to Adding a Ticket - Inventory.
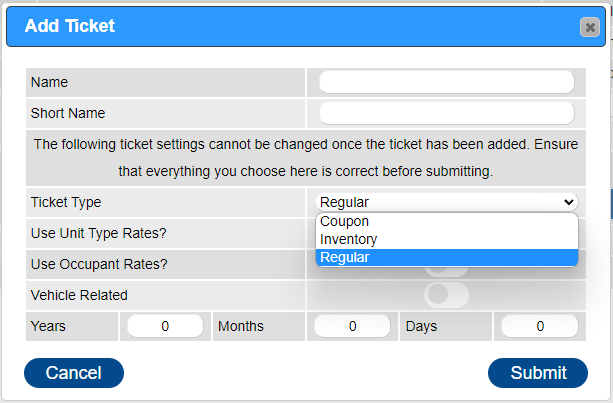
Adding a Ticket - Regular
- Use Unit Type Rates: Select if Unit Type(s) are applicable for the Tickets. Ticket rates are entered in Ticket Product Rates > Base Rates; ability to have different Ticket Rates per Unit Type.
- Use Occupant Rates: Select if the ticket rates are determined off the type of Occupant selected. Ticket rates are entered in Ticket Product Rates > Occupant Rates.
- NOTE: The Ticket Related Occupant Only flag must be enabled on the Occupant(s) in Occupant Setup.
- Vehicle Related: Select if vehicles are recorded on the ticket.
- Ticket Length: Enter the length of the ticket.
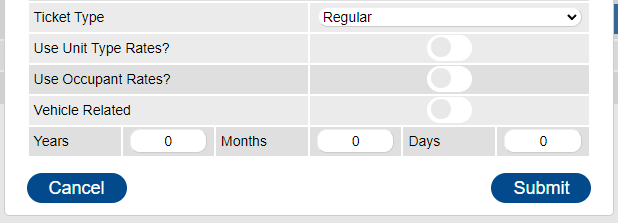
Adding a Ticket - Inventory
- Inventory Interval: Select the inventory interval associated with the ticket. Inventory Intervals need to be set up prior to the Ticket setup.
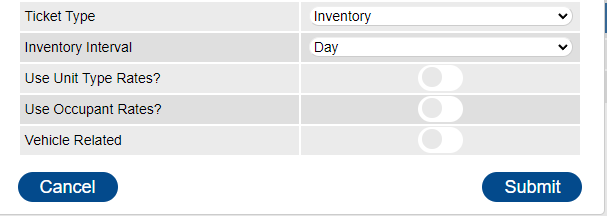
Coupon - Adding a Coupon Ticket
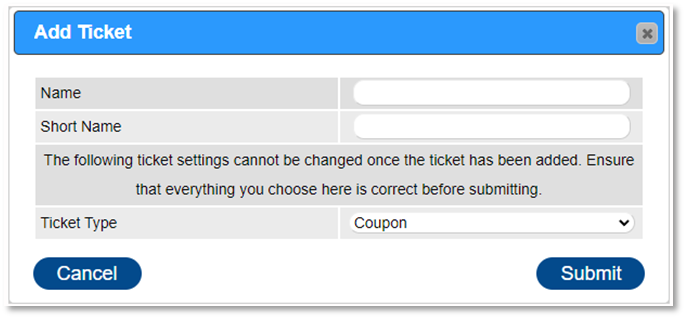
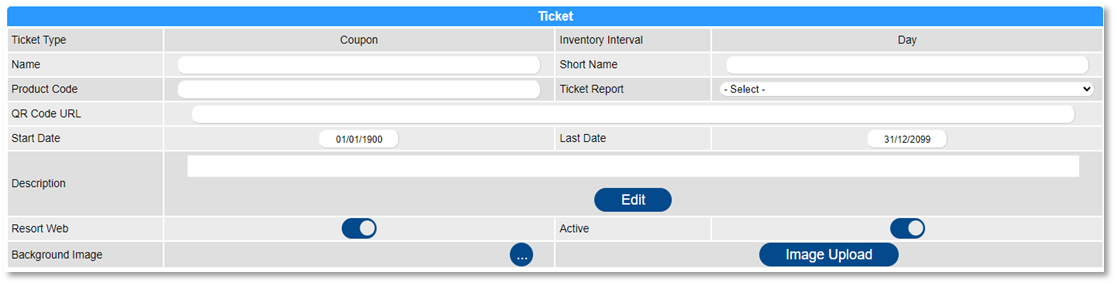
- The information (Name, Short Name) will prepopulate.
- Product Code: Enter the product code of the ticket.
- Ticket Report: Select the ticket report to be printed/emailed to the guest.
- NOTE: Ticket reports are set up within Content Setup.
- QR Code URL: Enter the URL address for the QR Code.
- Start Date: Ticket Coupon is valid from date.
- Last Date: Ticket Coupon is valid until date.
- Description: Enter a description to display online. Wildcards available.
- Resort Web: Ticket Coupon is available online.
- NOTE: Resort Web Setup setting Resort Web Deals needs to be enabled.
- Active: Ticket Coupon is available for purchase/usage.
- Background Image: Ability to upload an image for the background of the printable coupon.
- Image Upload: Ability to upload images to display for the coupon on the online interface.
Coupon Tickets Online
To allow the coupons to be available for purchase via the Online Booking interface:
1. Click on a Menu button.
2. Select the Setup tab.
3. Click on Resort Web Setup.
4. Within the General tab, enable the Resort Web Deals slider.
5. Click Submit to finalize.
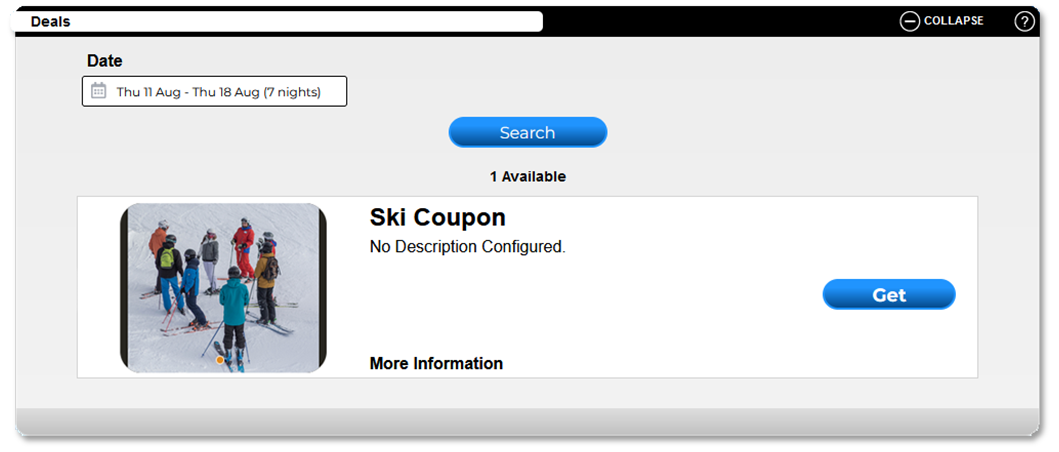
Online Interface display:
Regular - Adding a Regular Ticket
- The information (Name, Short Name) will prepopulate.
- Product Code: Enter the product code of the ticket.
- Ticket Report: Select the ticket report to be printed/emailed to the guest.
- NOTE: Ticket reports are set up within Content Setup.
- QR Code URL: Enter the URL address for the QR Code.
- Ticket Fee Product: If applying an additional booking fee to the ticket, select the required fee product.
- Start Date: Ticket Coupon is valid from date.
- Last Date: Ticket Coupon is valid until date.
- Max Inventory: Enter the maximum inventory available.
- Max Inventory – Resort Web: Enter the maximum inventory available for purchase on the online ticket interface. Note: This max inventory value cannot be greater than the total inventory available.
- Sold: Will display the number of tickets sold.
- Sold – Resort Web: Will display the number of tickets sold via the online ticket interface.
- Occupants: When Use Occupant Rates has been selected, select the Occupants associated with the Ticket.
- If no occupants are listed, go to Occupant Setup and enable the ticket selector for each occupant type to be used with tickets.
- Taxes: Select the required Tax for the ticket.
- GL Numbers: Select the required GL code for the ticket.
- Description: Enter a description to display online. Wildcards available. 500 characters will display on the online interface. After 500 characters, a Read More will display allowing the customer to view the full description text.
- Background Image: Ability to upload an image for the background of the printable ticket.
- Active: Enable when the ticket is active to be purchased.
- Image Upload: Ability to upload images to display for the ticket on the online interface.
- Length Of Ticket/Stay: The length of the ticket indicated when adding the ticket will display.
- Days Of Week: Ability to select the days of the week that the ticket is applicable for.
Regular Ticket Rates
To enter the Ticket Rates:
1. Click on a Menu button.
2. Select the Setup tab.
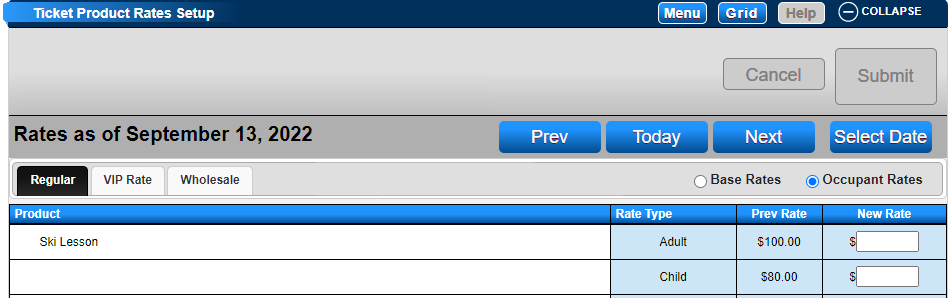
3. Click on Ticket Product Rates Setup.
4. Enter the rates into the New Rate column.
5. Select Date button is available to enter future ticket rate changes.
6. If the Occupant Rates setting has been enabled, click on the Occupant Rates radio button.
7. Enter the rates into the New Rate column against each occupant type applicable for the ticket.
Selling Tickets Online
To allow the tickets to be available for purchase via the Online Booking interface:
1. Click on a Menu button.
2. Select the Setup tab.
3. Click on Resort Web Setup.
4. Within the General tab, enable the Resort Web Ticketing slider.
5. Click Submit to finalize.
6. Click on the Availability tab.
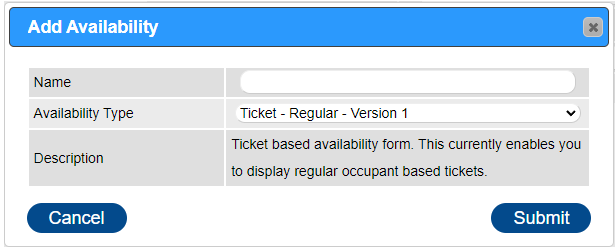
7. Click Add.
8. Enter the name of the ticket or ticket group that will appear as the tab label online.
9. Select the Availability Type - Ticket - Regular - Version 1 (for Occupant Based tickets) or Ticket - Regular - Version 2 (for Vehicle Related Tickets).
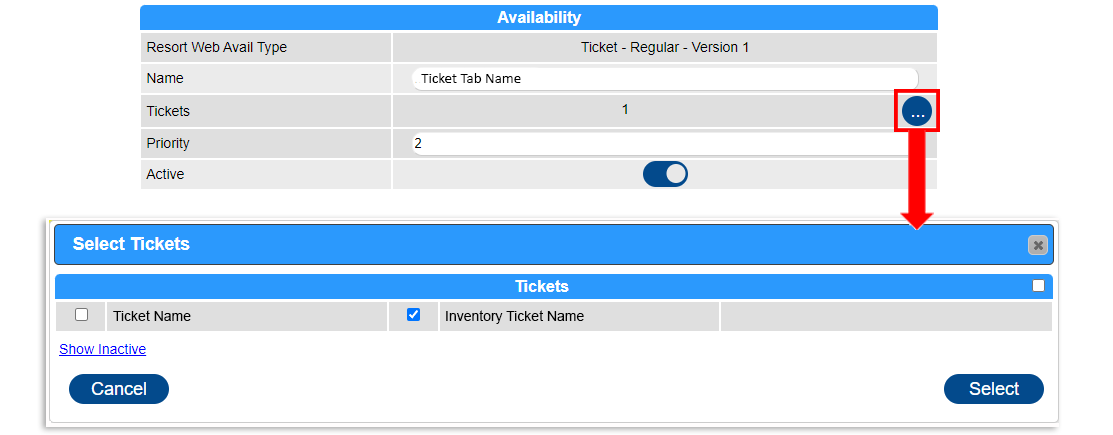
Within the Availability display, click the Tickets button to select the tickets to display within the tab.
- NOTE: If a ticket is not displaying in the options, the ticket does not meet the criteria of the Ticket Version selected.
Regular - Adding an Inventory Ticket
- The information (Name, Short Name) will prepopulate.
- Product Code: Enter the product code of the ticket.
- Ticket Report: Select the ticket report to be printed/emailed to the guest.
- NOTE: Ticket reports are set up within Content Setup.
- QR Code URL: Enter the URL address for the QR Code.
- Ticket Fee Product: If applying an additional booking fee to the ticket, select the required fee product.
- # of Days Drop Down: If the ticket has consecutive dates, enter the total number of days that can be selected.
- Taxes: Select the required Tax for the ticket.
- GL Numbers: Select the required GL code for the ticket.
- Description: Enter a description to display online. Wildcards available. 500 characters will display on the online interface. After 500 characters, a Read More will display allowing the customer to view the full description text.
- Background Image: Ability to upload an image for the background of the printable ticket.
- Active: Enable when the ticket is active to be purchased.
- Image Upload: Ability to upload images to display for the ticket on the online interface.
Assigning Inventory
- The Inventory tab contains the Inventory for the Inventory Ticket.
- The current month will display.
- Ability to adjust the different Month using the Year – Month dropdown at the bottom of the panel.
- Status: Ability to view active or inactive tickets for the month selected.
- Fill: The Fill button will allow for the inventory to be entered.
- The Fill Inventory box will display.
- Adjust the date range to the required date range.
- Fill: Ability to enter the Ticket Inventory for All days of the week or selected days of the week.
- Inventory: Total inventory of the ticket.
- Inventory – Resort Web: Inventory of the total inventory that can be purchased on the online interface.
Inventory Ticket Rates
To enter the Ticket Rates:
1. Click on a Menu button.
2. Select the Setup tab.
3. Click on Ticket Product Rates Setup.
4. Enter the rates into the New Rate column.
5. Select Date button is available to enter future ticket rate changes.
Selling Tickets Online
To allow the tickets to be available for purchase via the Online Booking interface:
1. Click on a Menu button.
2. Select the Setup tab.
3. Click on Resort Web Setup.
4. Within the General tab, enable the Resort Web Ticketing slider.
5. Click Submit to finalize.
6. Click on the Availability tab.
7. Click Add.
8. Enter the name of the ticket or ticket group that will appear as the tab label online.
9. Select the Availability Type - Ticket - DTTM - Version 1.
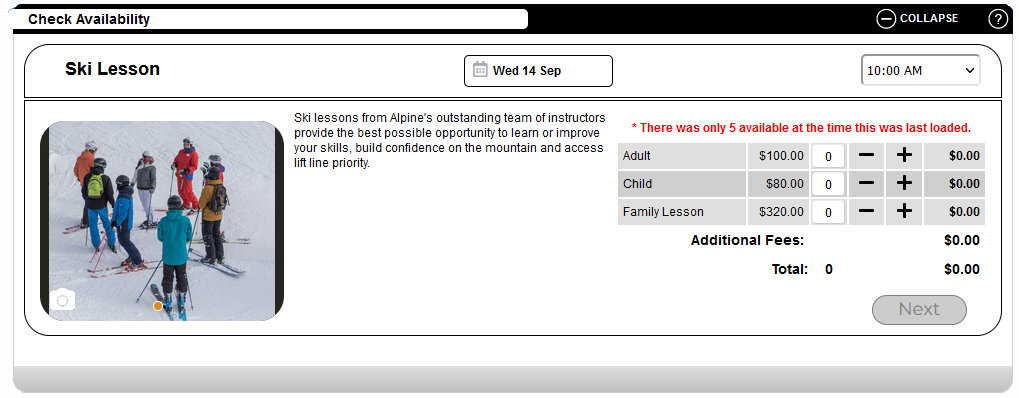
Online Interface display:
Troubleshooting
N/A