Permit Manager Panel Usage Instructions
Last modified on:
Overview
The Permit Manager panel displays all sold permits.
Prerequisites
- Access to the Menu
- Admin privileges
Steps
Location
- Click on the Menu button.
- Click the Admin tab.
- Select Permit Manager.
Panel
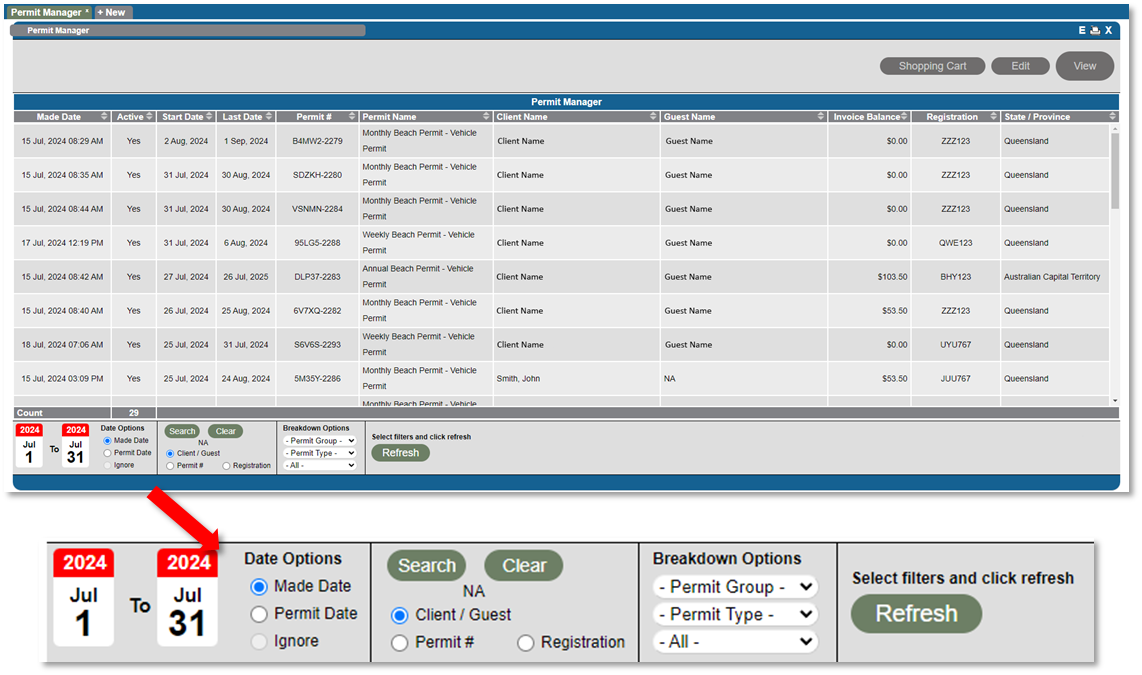
- Made Date: Date the permit was sold.
- Active: Status of the permit.
- Start Date: Date the permit is valid from.
- Last Date: Date the permit is valid until.
- Permit #: Permit number.
- Permit Name: Permit type label.
- Client Name: Name of the client who purchased the permit.
- Guest Name: Name of the client associated with the permit.
- Invoice Balance: Any outstanding balance of the permit.
- Registration: Registration number of the vehicle associated with the permit.
- State: State/Territory of the vehicle associated with the permit.
Search Options
- Made Date: Date range the permit was sold.
- Permit Date: Date range of the permit validity.
- Click Search to enter the required search option.
- Client Name: Ability to search for the client who purchased the permit or the client associated with the permit.
- Permit #: Ability to search for a selected permit number.
- Registration: Ability to search for the registration associated with the permit.
- Select the required search parameter and click Search to enter the client name or permit number to be searched for.
- Click Clear to clear out the searched client name or permit number.
Breakdown Options
- Ability to narrow down the display options to a specific type of permit.
- Dropdown options available:
- Permit Group
- Permit Type (The Permit Group needs to be selected prior to the Permit Type being selected.)
- Status
- Click on the dropdown(s) to select the required permit type and click Refresh.
Viewing a Permit
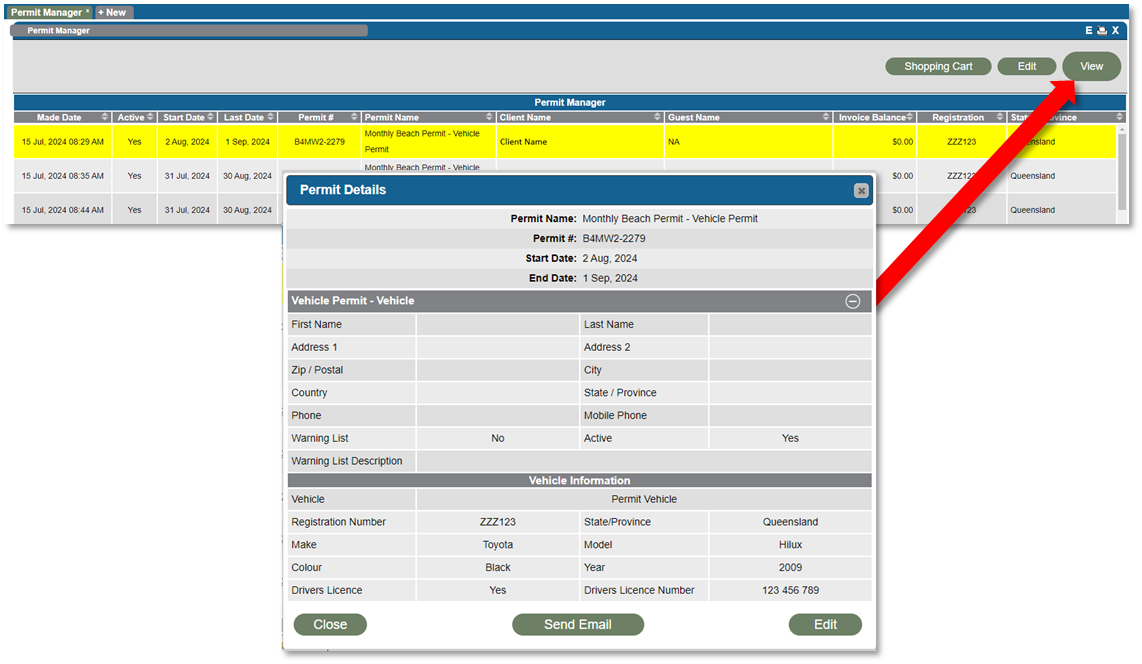
- To view a selected permit's details, select the permit, and the line will change to a yellow color to indicate selection.
- Three buttons will highlight:
- Shopping Cart: Directs you to the shopping cart of the permit to view the purchase/payment information.
- Edit: Allows you to make edits to the permit details.
- View: Allows you to view the permit details and edit them.
- Click the View button to view the permit details.
- The Edit button allows you to make edits to the permit details such as start date, guest name details, and vehicle information.
- Send Email button allows you to send the permit confirmation email to the customer with the updated permit details.
- Within the permit details, the client’s information will display.
- The Warning List flag allows for a warning flag to be associated with the permit.
- The Active flag allows for a permit to be made inactive.
- Warning List and Active flag will display in the Mini Console – Permit Search to alert staff.
Troubleshooting
- Ensure you have the necessary privileges to access the Permit Manager.
- Verify the correct selection of search parameters to obtain accurate results.
- If issues persist, consult the system administrator for further assistance.