Creating AR Accounts for Businesses
Last modified on:
Overview
Account Receivable (AR) accounts enable operators to transfer reservation and POS charges to the account for future payment. This document outlines the process of creating AR accounts for businesses or companies.
Prerequisites
- Access to the Account Manager and Client Editor panels.
- Business or company information for which the AR account is to be created.
Steps
Option 1: Client Editor
- Search for Business/Company:
- Click on the Search button on the Availability Grid.
- Select the Business tab and search for the desired company. - Edit Client:
- Within the Selected Client box, click Edit to display the Client Editor record for the business/company. - Activate AR Account:
- Tick the Activate Account Receivable flag.
- An AR Account is created for the business/company. - Access Client Editor:
- Within a business's reservation, click Edit next to the business's name to access the Client Editor.
Option 2: Account Manager
- Access Account Manager:
- Click on Account within the Menu Bar to navigate to the Account Review/Aging panel. - Create New Account:
- Click Add to open the Account Manager panel.
- Enter the business/company name and click Search. - Account Editor:
- After selecting the client, click the Account Editor tab.
- Click Add to create a new account. - Account Details:
- Select Account Receivable from the Account Type dropdown.
- Enter the account details:
- Credit Limit: Specify the account limit.
- Terms: Select the billing period.
- Press Submit to create the new account.
Reservation Balance to AR Account
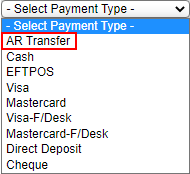
- For businesses/companies with an AR account, the "AR Transfer" option is available in the Payment Type selection when paying a reservation balance.
- Balances are transferred into the Account Manager.
- Payment and print options are available from the Account Manager.
Statements
- Transactions in the Business/Company’s Account Manager will appear on the current Account Statement.
- To expand the date range, click on the From date.
- Click Print Stmt to print the Account Statement.
Transaction Invoices/Receipts
- Click on the transaction’s Invoice # to print an invoice or receipt.
Troubleshooting
- Ensure all required fields are filled when creating a new account.
- Verify that the Activate Account Receivable flag is ticked to enable AR account creation.
- If transactions do not appear on the statement, check the date range settings.
For additional help, refer to the Help Document.