Periodic Billing Policy for Long-Term Residents
Last modified on:
Overview
This document provides a step-by-step guide to creating a periodic billing policy for a long-term resident. It covers the setup of unit types, rent products, and billing policies to ensure accurate and efficient billing processes.
Prerequisites
- Access to the system's Setup menu
- Knowledge of the Business Setup and Pricing and Rates sections
- Understanding of product group and rate setup
Steps
Setup Unit Types and Rates
- Access Setup:
- Click on Setup from the Menu Bar. - Create Long Term Unit Types:
- Navigate to Business Setup > 7. Unit Types > Units > Features.
- Create the Long Term Unit Types. - Enter Rates:
- Go to Pricing and Rates > 3. Rate Setup.
- Enter a $0.00 rate for Long Term unit types in the Regular rate group tab.
- Press Submit to finalize the rates.
- Select the Occupant Rates radio button, enter a $0.00 rate, and press Submit. - Create Long Term View:
- In Business Setup > 15. View Setup, create a Long Term View tab for the Long Term Unit Types.
Setup Rent Products
- Create Product Group:
- Go to Business Setup > 9. Products and Services.
- Select Product Group Setup and click Add to create the Product Group Long Term Rents.
- Press Submit and refresh the screen (F5). - Create Rent Levels:
- Open Product Setup and click Add to create the rent levels as products (e.g., Rent $100, Rent $150, Holiday Vans $1250).
- Fill in:
- Label: Name of the Rental Charge (e.g., Rent $100).
- Group: Select the Product Group Long Term Rents.
- GL Type: Revenue.
- Taxes: Select the Long Term Tax.
- ROS Users:
- For permanent residents with a balance, create a second product ROS Opening Balance.
- Group: Select the Product Group Long Term Rents.
- GL Type: Revenue.
- Taxes: Select the Long Term Tax.
Setup Rent Products Prices
- Enter Prices:
- Click on Setup.
- In Pricing and Rates > 4. Product Rate Setup under the Regular tab, expand the Product Group Long Term Rents.
- Enter prices for each rent level and press Submit.
Create Reservation
- Create Reservation:
- Create the reservation for the resident's stay duration.
- Enter client details and check in the reservation as normal. - Setup Billing:
- After checking in, switch to the Charges/Payments tab.
- In the Billing section, click Setup.
Billing Setup
- Access Billing Policy Setup:
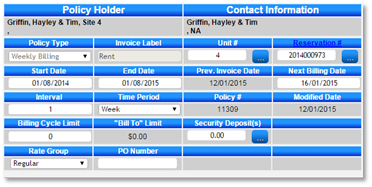
- Clicking Setup directs you to the Billing Policy Setup panel.
- Ensure the correct Billing Policy Type is selected. - Verify Details:
- Unit #: Taken from the reservation.
- Reservation #: Taken from the reservation.
- Start Date: Reservation’s Check In date.
- End Date: Reservation’s Check Out date.
- Next Billing Date: Same as the Start Date.
- Time Period/Interval: Ensure correct selection.
Add Rental Product
- Add Product:
- Under Products/Services tab, click Add.
- Product Group: Reservations Products.
- Product Label: Select the Unit Type (e.g., Permanent Site).
- Rate Type: Select User Defined Rate.
- Base Rate: Enter the Rent Amount.
- Tax 1: Select the appropriate Tax (e.g., Perm 5.5%). - Finalize Product:
- Click Add to add the new Rental Product to the policy.
- Press Submit to finalize the change.
- Click Activate to activate the policy.
Troubleshooting
- Ensure all rates and products are correctly entered and submitted.
- Verify that the correct Billing Policy Type and Time Period/Interval are selected.
- For any discrepancies, review the setup steps and confirm all entries are accurate.