Inventory Setup and Management Guide
Last modified on:
Overview
The Inventory Setup section allows users to create, manage, and configure the settings for both Unit Types and individual Units. This is a core part of setting up your property’s availability and layout in the system.
- Unit Types represent the categories or classifications of your accommodations (e.g., Tent Site, RV Site, Cabin, Deluxe Cabin).
- Units are the specific instances of those types—such as "Cabin 1", "Cabin 2", etc.
Prerequisites
Ensure you have access to the system with the necessary permissions to manage inventory settings.
Steps
Location
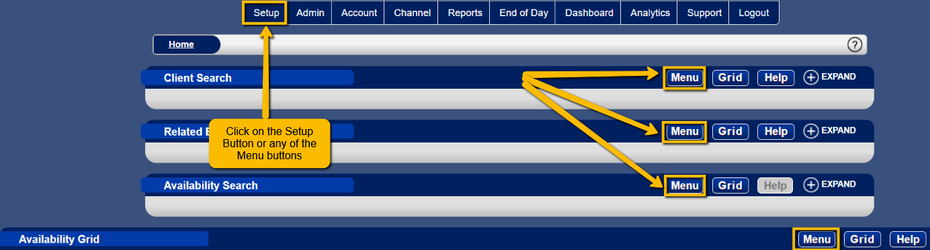
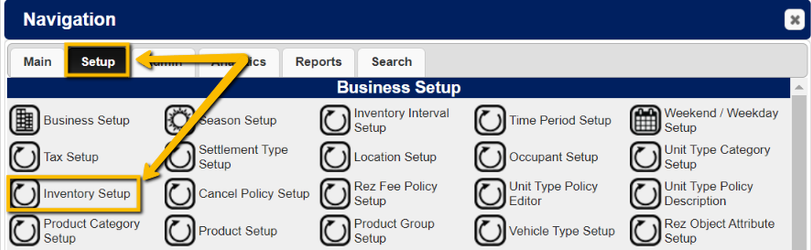
Navigate to:
- Setup button or any ‘Menu’ button
- Setup Tab
- Inventory Setup
Unit Type Setup
Buttons (Unit Type Tab)

- Global Document Upload: To upload PDF Documents for email attachments for all Unit Types.
- Global Image Upload: To upload Images to display on the Online Booking interface for all Unit Types.
- Sort: Arrange the order of your Unit Types for the All Types Grid and reports.
- Add Units: To create a unit.
- Add: To create a Unit Type.
- Delete: To delete a Unit Type.
Adding a Unit Type
- Click on the ‘Add’ Button
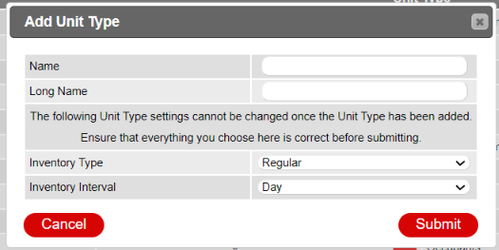
- Name: Enter the Name of the Unit Type – this will display on the Console Grid.
- Long Name: Enter the unit type name. This name will be displayed on reports and client correspondence.
- Inventory Type: Select Regular or Down to the Minute
Click on the Submit button after filling the required fields.
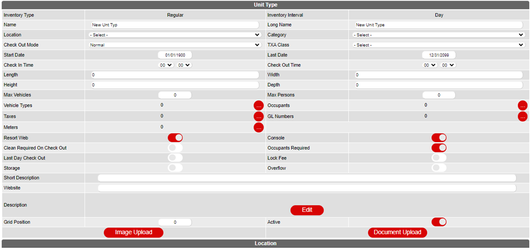
Fields with their description
Field | Definition
|
Check Out Mode: Normal | Regular Check In/Out mode (for regular accommodation unit types). |
Check Out Mode: Single Day | Same check in/out functionality (same day booking). |
Check Out Mode: Check Out Last Day | Allows the reservation to be checked out on the last day. Doesn’t release the inventory on the last day. |
TXA Class | When Channel Management module is enabled, additional fields appear. For Tourism Exchange Australia, the TXA Class drop down appears to select the Accommodation Type. For Siteminder, the Siteminder Room Code field displays to enter the Room Code. |
Start Date | Date the Unit Type opened up. |
Last Date | Date the Unit Type will/has closed. |
Length, Width, Height, Depth | Enter the dimensions of the unit if applicable. If the Unit Type is length sensitive (e.g., Camping Site), these fields indicate the maximum size of the unit. |
Max Vehicles | Maximum number of vehicles allowed for this unit type. |
Max Persons | Maximum number of occupants allowed for this unit type. |
Vehicle Types | List the types of vehicles allowed (e.g., car, motorcycle), based on Vehicle Setup. |
Occupants | Select allowed occupant types. Set the included occupants in base charge and the maximum allowed for each type. |
Taxes | Select applicable tax(es). |
GL | Enter General Ledger numbers if needed for accounting. |
Meters | If the Unit Type has meters set up, select applicable meters. |
Resort Web | Enabled if this unit type should be available on the online booking portal. |
Console | When disabled, the Unit Type will be hidden on the Grid. |
Flag As Cleaning Required on Check Out | Enable if Unit Type requires cleaning after check-out. It will also appear in the Cleaning Report if configured. |
Occupants Required | Indicates if specifying occupants is mandatory. Useful for Storage Unit Types. |
Lock Fee | Select if guests are allowed to pay a lock fee to secure a site on this unit type when booking online. |
Storage | Toggle to indicate if this Unit Type is a Storage Unit Type. |
Short Description | Brief description of the unit type, available via a wildcard in the Content Setup. |
Website | Enter the website URL where more information about the unit type can be found. |
Description | Displays on the Online Booking page and within the Booking Conflicts drop down. |
Grid Position | Determines the order the unit type is displayed in Reports and the All Types Tab. |
Image Upload Button | Upload images of the Unit Type to display on the Online Booking interface. |
Document Upload Button | Upload PDF documents for email attachments related to the Unit Type. |
Active | Check this box to make the Unit Type active and available for booking. When unchecked, the Unit Type is decommissioned. |
Unit Setup
Buttons (Unit Tab)

- Edit All: Quickly modify units names, grid positions, start/last date, dimensions & delete multiple units
- Add: To create a new unit
- Delete: To remove a unit.
Adding a Unit
- Click on the ‘Unit’ tab and then the ‘Add’ button.
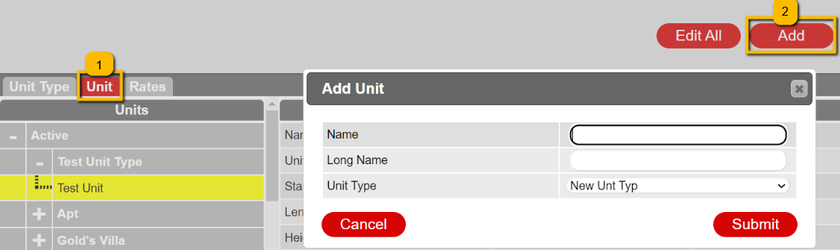
Field | Definition
|
Name | Enter the name of the unit (e.g., "4"). |
Long Name | Provide a more detailed name for the unit. |
Unit Type | Select the unit type from the list. |
Capacity | Configure units with multiple capacities so more than one person or group can book them. For example, dorm rooms with 8 beds. |
Start Date | Enter the date from which the unit is available. |
Last Date | Enter the last date the unit is available. |
Length | Enter the specific length of the unit if it differs from the maximum dimensions in Unit Type setup. It will restrict vehicles exceeding this length from being checked into the unit. |
Width/Height/Depth | Enter the width, height, or depth for the unit. Used for marinas and campsites with size restrictions. |
Alert | Add an alert color to the unit. |
Access Rights | Specify access rights based on the Security Gates Setup. |
Unit Rez Link | Link this unit to another unit (e.g., linking DTTM and regular inventory so that when one is booked, the other is automatically booked and unavailable). |
Meters | Add a meter to the unit. |
Closed Dates | Create blackout dates to make the unit unavailable. |
Requires Cleaning | Toggle on if the unit requires cleaning. This will apply the alert color to the unit on the grid and appear in the Cleaning Report. |
Client Review | Allow for client reviews/feedback, if the client review module is enabled. |
Description | Provide a detailed description of the unit. Click "Edit" to update. |
Directions | Enter directions in the Unit Description, e.g., shady site near the lake. It displays in the Upcoming Bookings & Pencil In drop down when the unit is clicked on the Availability Grid. |
Grid Position | The sort value determines where the unit is displayed on the grid. |
Active | Check this box to make the unit active and available for booking. If unchecked, the unit is decommissioned. |
Image Upload Button | Upload images of the unit to display on the Online Booking interface. |
Document Upload Button | Upload PDF documents for email attachments specific to the unit. |
Uploading Documents
How to upload a Document for All Unit Types
- Upload documents that apply to every unit type in the system
- Click on the ‘Global Document Upload’ button and then select the 'Upload’ button to upload the file.
Note: Only PDF documents are allowed and must be less than 5MB in size
How to upload a Document for a Unit Type
- Upload documents relevant to a particular unit type, like a detailed guide or specific rules.
- Click on the ‘Unit Type’ Tab, select the Unit Type from the list. Then click on the ‘Document Upload’ button to upload the file.
Note: Only PDF documents are allowed and must be less than 5MB in size
How to Upload a Document for a Unit
- Upload documents specific to an individual unit
- Click on the ‘Unit’ Tab, select the Unit from the list. Then click on the ‘Document Upload’ button to upload the file.
Note: Only PDF documents are allowed and must be less than 5MB in size
After uploading a document the following options will be available:
- Console Conf: Attaches the document to your Default Confirmation Email sent from the Console
- Resort Web Conf: Attaches the document to the Reservation Confirmation email from the Online Portal.
- Pre-Auto: Configure this setting if the document will be attached to your ‘Before Reservation Check In’ marketing emails.
- Post-Auto: Configure this setting if the document will be attached to your ‘After Reservation Checked Out’ marketing emails.
Uploading Images
How to upload an Image for All Unit Types
- Upload Images that apply to every unit type in the system
- Click on the ‘Global Image Upload’ button and then select the 'Upload’ button to upload the file.
Note: Only png, jpg and bmp images are allowed and must be less than 5MB in size
How to upload an Image for a Unit Type
- Upload Images relevant to a particular unit type.
- Click on the ‘Unit Type’ Tab, select the Unit Type from the list. Then click on the ‘Image Upload’ button to upload the file.
Note: Only png, jpg and bmp images are allowed and must be less than 5MB in size
How to Upload an Image for a Unit
- Upload Images specific to an individual unit.
- Click on the ‘Unit’ Tab, select the Unit from the list. Then click on the ‘Image Upload’ button to upload the file.
Note: Only png, jpg and bmp images are allowed and must be less than 5MB in size
Uploading Multiple Images
- Batch Upload: Images under 1000KB can typically be uploaded in batches of 5 or more, whereas images exceeding 1000KB are generally subject to a maximum upload limit of 4.
Troubleshooting
- Ensure all documents and images meet the size and format requirements before uploading.
- Verify that you have the necessary permissions to manage inventory settings.
- If you encounter issues with uploading, check your internet connection and try again.